First off, it is important to understand the requirement of the web application that is going to be built and along with it the data. And apart from this, it is imperative to analyze to at least an approximate value of the weight of the data required for the e-commerce business to thrive online.
At the simplest level, there are many free and paid ‘Amazon AMIs’ that provide the setup stack for your new cloud server. If you are not keen on learning how the stack setup works and want to get on to making the site live in a plug and play fashion, this would be ideal. Here’s the link to AWS marketplace:
Now, before we go into setting up cloud server, I’d like to touch base with what cloud server is and why it is so fantastic in the geek world?!
Cloud Computing is nothing but clusters of tangible hardware that have computing power of enormous value. Imagine a whole city under a roof and only has CPUs (Computer Processing Units) tied to each other with the latest Intel or other microprocessor supplier and all the latest hardware you would want to see in your desktop. This huge!
The security offered is also great as Amazon is very serious about it’s security and data servers.
The best part of cloud computing for hosting of web applications is the scalability which allows you to start small and grow as your business and web traffic grows.
For ease, I have split the post into four parts to get into every detail.
I’m going to also show how to build the LEMP [Linux NGINX Mysql Php] stack on the instances, create security groups, provide FTP access and install PhpMyAdmin for Mysql access.
I will be posting about running MySQL within the instance and as RDS (Amazon’s database service) in a separate post as well.
The process beings with signing up for AWS services.
Go to https://www.amazon.com and signup, a credit card verification would be carried out to complete the signup process.
Once signed up, login to the AWS Management Console.
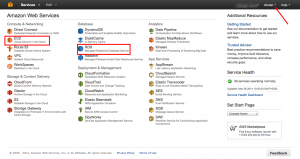
Click on EC2 to enter the instance management interface.
In AWS terminology, an instance is nothing but a server that physically runs on the location/region you choose to start at.
Select the region you’d want your server (instance) located in. The selection should be based on where your target market is and most of your traffic would come from.
Regions available with Amazon currently are:
In case your target audience is not the regions above, like for example India – you could choose the nearest server to your location, like Singapore. This will help minimize the data transfer time.
For this post, I will be using a server in Sydney.
Now, getting on to firing an Instance EC2 – see Part 2